Now while there are a few staple go to exercises that should form the bulk of any sound strength training program (deadlift, squats, single-leg work, push ups, pull ups, TGU’s etc…). It’s nice to have a few extra moves in the “toolbox” to keep things fun, motivating and sometimes maybe to kill a few birds with one stone.
Step in #1 in hopefully a long series of interesting moves to add to your strength and power training! The RFESS Iso Hold Med Ball Slam.
Sounds like a right handful but it’s not! Get into a rear foot elevated split squat position (a move that should be in your regular routine), Knee at 90 degrees, hips and shoulders square, pelvis neutral (no forward or backward tilt/slide) and then slam that med ball hard, reacting to the bounce, reloading and slamming again! Aim for 2-3 sets of 4-6 reps per side and be very certain you keep lead leg at 90 degrees, torso “tall”, hips and shoulders square and lead foot planted flat on the floor!
It’s a power move for the upper body, with isometric strength demands for the lower body and great hip, torso and shoulder mobility and stability demands thrown in for good measure! Slam hard and enjoy! Form is critical as always. I was only using a 3kg med-ball in the video below.
Stuck in a chair all day? Behind the wheel or spend alot of time on the road bike? Well all of those things can cause a loss of range of motion in the hips, spine and shoulders that can lead to low back pain, shoulder aches and all around poor “movement mechanics” for mountain bikers (of any discipline).
As mountain bikers we need great thoracic spine mobility, strong but free moving hips and mobile but stable shoulders to apply strength, create speed and absorb terrain! So by adding in the following stretches/mobility moves to your daily routine, whether it’s at home in the evenings with a cup of tea, in the cubicle at work or when your out walking the dog (imagine the looks you’d get) you can start creating the movement quality needed to maximise the fun you have on your bike!
1. Crucifix Stretch
How: Stand tall, neutral spine and neck, chest high, feet shoulder width apart. Body relaxed, not tense. Hold your arms straight out at your sides, palms down thumbs forward. As you breath out external rotate the shoulders so your palms face upwards and your thumbs backwards. You should feel that “sticking point” in your deltoid muscles (upper arm), hold it here for 3 secs, repeat the process 10-20 times.
Start Position
End position
2. Russian Baby Maker
Sadly this one doesn’t involve a partner as the name might suggest! It’s a difficult move for some to execute as it requires a certain amount of “glute control” and hip mobility to start with but it’s a good challenge and very effective stretch, almost creating a feeling of euphoria in the auld hips after a few reps!
How: Bend at the hips by shifting them back slightly, grasp the instep of each foot and hunker down into a half squat position (thigh just parallel to floor). From there drive the knees out by progressively sliding the elbows in towards your hips. Hold the position with a flat back, for 5-12 seconds, re-set and repeat for 5-8 reps. Start with what you can. Even holding the pose for 6 secs once in the beginning is enough for some to see some benefit.
Russian Baby Maker Front
Russian Baby Maker Side
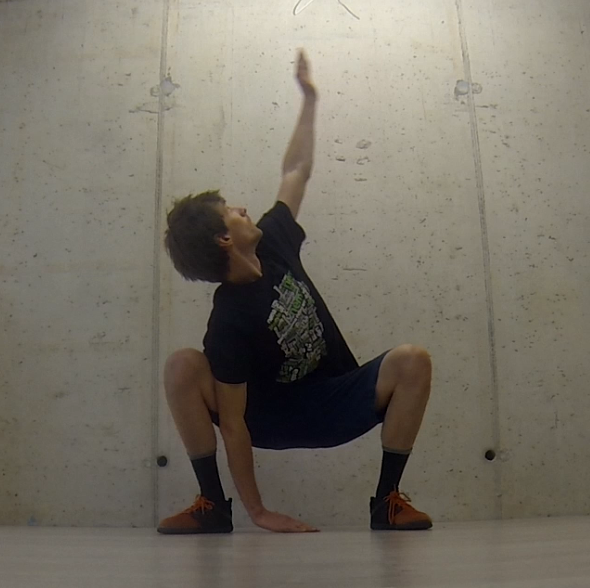
3. Thoracic Spine Overhead ReachOne of my favourite moves to help with riders cornering and general posture in the “attack position” on the bike, this move is real simple and really very effective because of it’s simplicity!
How: Once again get yourself into a deep squat position (you may need to just practice this on it’s own before progressing on). From here plant one hand firmly on the floor, elbow extended (locked out). Rotate smoothly so the other hand points skyward, all the time following the skyward hand with your eyes. The left and right side pictures should explain it all!