Categories
News Uncategorized

Repeat Sprint Pedaling Ability – Part 1 – Downhill

How often does one make full revolutions of the cranks in a DH race and during practice? Well that depends; course type, terrain, climatic and environmental conditions, gear ratios etc…

What is a certainty though is that pedaling during DH racing is intermittent i.e. occurring at irregular intervals; not continuous or steady”. While we ride DH on a bicycle, two wheels, cranks, chain etc… unlike our roadie or XC cousins, quite often the main means of locomotion for the DH athlete/rider isn’t application of force on the pedals but gravity! Having said that tough, what is also certain is that pedaling can be a determinant of performance and results.

So it goes without saying that understanding the energetics (how energy is supplied) for these intermittent repeat sprint bouts is quite important when looking to prepare yourself to meet the varied physical demands of DH. Interestingly repeat sprint ability is something that in the last decade has been study a great deal in the laboratory by many well respected sports scientists. Even more interesting is that many of the Repeat sprint Ability (RSA) testing protocols used in these studies mimic the demands of DH specific pedaling dynamics closer than they do the sports they are primarily testing/researching for (field and court sports, soccer, basketball, tennis, ARF, hurling etc…).

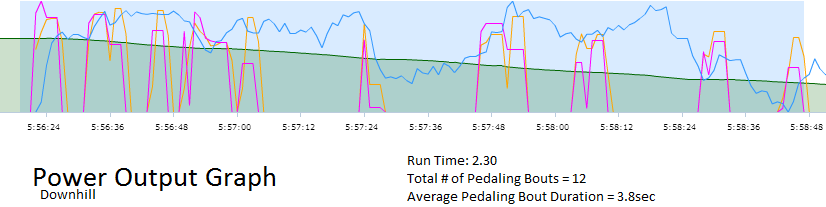
Many of the studies used a 6 sec “MAX” sprint interspersed by 24 to 30 sec of stationary/passive recovery. So if we look at a power metre graph from a fairly typical DH run we can see the similarities.

DH Power
Purple line = Power output in watts

Similarities there may be but on the other hand there are some key differences and this is where we will start our wee journey into hopefully understanding the Repeat Sprint Pedaling Demands of DH a little bit better and then go on to talk about the key areas we need to train to improve our RSPA – Repeat Sprint-Pedaling Ability!

What are you looking for?

As a DHer you’re looking for two key things to ensure optimal pedaling performance. 1)Achieving a high peak power output, 2)minimising the reduction in this peak power output over repeated sprints. In other words reducing your fatigueability over many repeat efforts on the pedals in one run. In short this IS Repeat Sprint Pedaling Ability.

The exact causes of fatigue during repeat sprints is the topic of hot debate and much research but having a clear grasp of the most likely and/or proven factors in RS fatigue is the first step in understanding how to train effectively to increase your potential to create repeat power!

Back to Basics

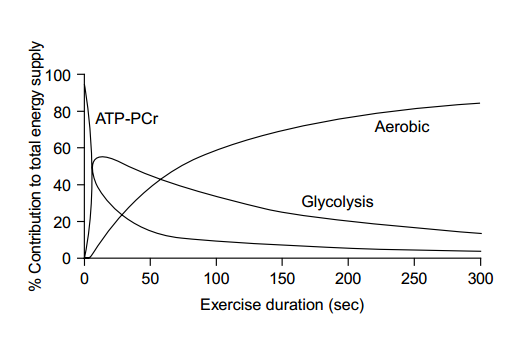
Before we get to a point where we can understand the factors that create fatigue and limit RSPA you’ve got to understand the relative contributions of each one of our three energy systems to “all-out” riding during a DH run.

The 3 energy systems are distinct but closely integrated, they operate together  in a sequential but overlapping manner to supply working muscle with the energy it demands. The energy systems are split into 2 categories. Aerobic (with oxygen) and Anaerobic (without oxygen). The Anaerobic systems are subdivided into ATP-PCr and Anaerobic Glycolytic (the infamous anaerobic lactic system).

The ATP – PCr system is the most direct supplier of energy to muscle. As a tiny amount of stored ATP (our energy currency) exists in skeletal muscle along side stores of the high energy phosphate Phosphocreatine (PCr), between the instant utilisation of ATP and the very fast breakdown of PCr large amounts of energy can be supplied to working muscle very quickly for a duration of up to 8 seconds give or take! This is why Sprint 1 of a DH race is the most powerful. Maximum stores of PCr, minimum fatigue, maximum neural drive!

The second anaerobic system is the glycolytic system, this is simply the break down of stored carbohydrate (glycogen) in the muscles with no oxygen. This is a fast supplier of energy as the reactions take place in the site where movement will be created, but it has it’s limitations as it creates many by-products that need to be shuttled away from the working muscles for movement to continue. The “lactic” system can provide energy for up to 75 secs but really beyond the 35 sec mark our next energy system, the Aerobic system, really kicks in.

Finally the aerobic system breaks down stores of fat and carbohydrate to produce ATP (our energy currency), this happens in the muscle but not directly at thesite of movement, so it’s not quite as “fast”. But if we are correctly warmed up then aerobic metabolism produces a large percentage of our energy for any “all-out” activity beyond the 75sec mark! And remember the average DH World Cup run is 225 to 275sec in duration.


Paul B. Gastin - http://www.fmh.utl.pt/agon/cpfmh/docs/documentos/recursos/112/GastinSistemasEnerg%E9ticos.pdf
Paul B. Gastin – http://www.fmh.utl.pt/agon/cpfmh/docs/documentos/recursos/112/GastinSistemasEnerg%E9ticos.pdf


How it fits into DH Specific RSPA?

Right so now that we have the dull stuff out of the way let’s get down to business. AS we could see in the power trace graph further up DH often requires a hard initial sprint out of the start gate, followed by repeat “all-out” efforts on the pedals at irregular intervals. You can have anything from 3-5 secs right up to minutes between pedaling efforts (ala Val di Sole). Usually though it’s pedaling bouts of 3-6 secs with gaps between of 10 – 25secs.

So most of the very good research out there points to 2 things, firstly the initial sprint performance is very important and that this initial sprint of 3-6 sec is fueled mainly by the ATP-PCr system. With gaps of 10-25sec between repeat efforts on the pedals it is again the ATP-PCr system that fuels the efforts but onl if your AEROBIC system is “fit” enough to replenishes your PCr stores, as it is solely the Aerobic system that replenishes your stocks of PCr! Finally once you get out to the 225 sec + mark in time it looks like the fittest athletes with the best RSPA rely heavily on the aerobic system to fuel these final sprints with the glycolytic system contributing only ¬8%!

Pie chart below showing what I’m talking about from the great review on the subject by Girard et al 2011 Sports Med 2011; 41 (8): 673-694first and last sprint

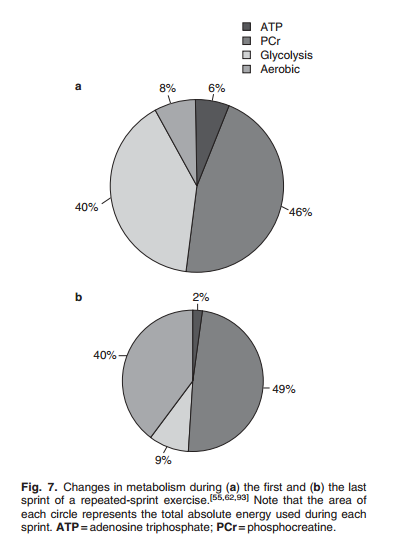
So things seem clear for now…right? The above test protocol was 10 X 6 sec sprints with 30 sec recovery between them, so not to dissimilar to the demands of DH pedaling….right? Well maybe it’s not that simple! The 30 sec recovery between the 6 sec effort sin the above study was total rest, stationary chill-out until your next 6 sec bout and that’s where the similarities with DH end!

Because as we all know between sprints on your DH bike there’s usually a whole lot happening, riding! Yep the main bulk of our performance and most certainly the main determinant of performance is actually riding your bike and riding it FAST. So how does that effect your RSPA? Well it’s something that has never been directly studied, but as a coach for many DH athletes it’s something I can certainly make some educated assumptions about!

What do we do?

Well basically you hang off the steed at a million clicks and try hit your lines? Well not quite but the demands of DH are pretty varied and as such are pretty complete. The basic goal is choosing the best, fastest line from A to B and executing the required techniques at the required time to make your lines and carry the required speed to have the fastest time! Simple!

But the energy demanded by riding as fast as possible from A to B is substantial. Especially when the terrain is rough, steep, fast and gnarly. The mix of isometric, eccentric and concentric muscular contractions, the fine and gross motor skills that executing a huge range of techniques requires is hugely energy hungry. Maintaining posture, exploding off jumps, hitting and skipping over huge holes, railing berms, climbing off-cambers and shredding turns all require energy to be produced by all 3 energy systems in unison by in time and intensity dependent amounts.

How riding affects pedaling?

No need to complicate the discussion really. The harder you ride the more intramuscular energy stores you’ll burn and the less likely you are to have re-synthesized even partial amounts of PCr for pedaling after the first sprint. But, the more skillful you are, the better your technique is and the less energy you expend while riding at optimal pace the more likely it is that you’ll still have adequate stores of ATP, PCr and muscle glycogen to fuel very rapid metabolic reactions to power short sprint efforts. Likewise as the muscles we use to maintain riding posture and execute techniques are not used in exactly the same way and with the same inter and intra-muscular co-ordination as during pedaling then we can assume that the more aerobically fit you are the more likely you are to re-synthesize stores of PCr that could be used for explosive pedaling actions.

It’s an interesting topic and something that warrants good research, we know that steep natural tracks are more physically demanding in their riding induced loads (Hurst, Swaern et.al 2013) than “bike-park” style tracks, but often steep natural tracks require little pedaling and certainly show few of the hallmarks of the demands of RSPA.

Course duration too will have a large effect on inter-relationship of the three energy systems and how your body chooses to supply the required metabolic energy to make the muscles contract in sequence for pedaling.

Alot of these “issues” presented have some pretty common sense, evidence backed answers. As we’ll see below.

How to ensure “RSPA” performance?

How to train for supreme RSPA performance? First identify the limiting factors, understand how to improve them then integrate the training.

One of my favourite quotes is “you can’t maintain what you don’t have”, basically looking to improve your sprint capacity or repeat sprint ability is pretty worthless if you can’t sprint in the first place. So training the mechanical factors like strength then power, intra muscular co-ordination, neural drive, fibre type, motor-unit recruitment etc… is key! These can be trained in the gym and on the bike. With the gym offering many benefits the bike does not.

Once mechanical power production is developed it needs to be supported by the metabolic processes, the energy systems and other factors such as enzyme activation and energy stores.

Training the aerobic system to it’s optimal state so re-synthesis of PCr is improved (Bishop, Girard et.al 2011), one study carried out in Norway ( Balsom et.al; Acta Physiol Scand 1994) showed large (11%+) improvements in RSA (again 10 X 6sec sprints) when participants where administered EPO, thus improving the oxygen carrying capacity of their blood and subsequently aerobic “fitness”. Like-wise similar RSA tests where participants have actively restricted blood flow (ischemia) to the legs their was a marked reduction in RSA performance over 10 sprints due to the inability of the aerobic system to re-synthesis PCr stores and actively provide energy for muscular contraction in it’s own right.

Starting training session in a fully fueled state so training “impulse” and signaling for a sprint session is at it’s highest.

Training to resist, buffer or better deal with metabolic by-products of high intensity exercise created by the Anaerobic Glycolytic system should also be considered, especially for mixed tracks that require a variety of riding styles or techniques and pedaling. The inorganic phosphates and general acidosis created by anaerobic glycolytic metabolism play havoc within muscle tissue and reduce the “excitability” of the muscles, reducing their contractile function and intra-muscular co-ordination, one of the main reasons why increases in fatigue causes crashes, falls, poor performance or that feeling of being a complete tool on the bike!

Improving your technique and skill on the bike will possibly lead to less energy expended for the same speed A to B and as such more potential energy available to fuel sprint pedaling performances and possibly more window for your aerobic system to re-synthesis PCr in the “pedaling muscles”.

Integrating any training you do to actually “work” on your race bike under conditions characteristic of the sport is also a crucial area often over-looked by many.

The importance of training the anaerobic glycolytic pathways of energy production for pedaling performance for DH is highly debatable. There certainly are specific courses (PMB, Canberra) where this type of training could be beneficial but much of the anaerobic fueled demands in DH are not pedaling induced, but riding induced.

Wrap Up

Much of the data, studies and evidence presented here comes from repeat pedaling tests, but designed by scientist looking into the demands of field and court based sports not MTB. So as such common-sense and experience based critical analysis should be applied to everything you read.

Are the pedaling bouts in DH repeat, sporadic and intermittent in nature? YES. Is each course equal? No. Do the demands on energy supply and change with the activity profile and riding dynamics of each individual course…absolutely! What does all that mean for the DHer looking to improve their performance on the pedals? Get strong, be fluid on the bike, relax, train all 3 energy systems but not all the time nor in equal amounts.

Every one has their own strengths and weaknesses. But with the huge variety in courses, pedaling demands and the ever changing environment (weather, altitude, courses etc..) you face as a DHer having a well tuned aerobic system and a big strength foundation will serve you very well. Couple that with good mobility, flexibility, adequate nutrition and characteristic training and you’ll be well on your way to pedaling well on your DH bike.

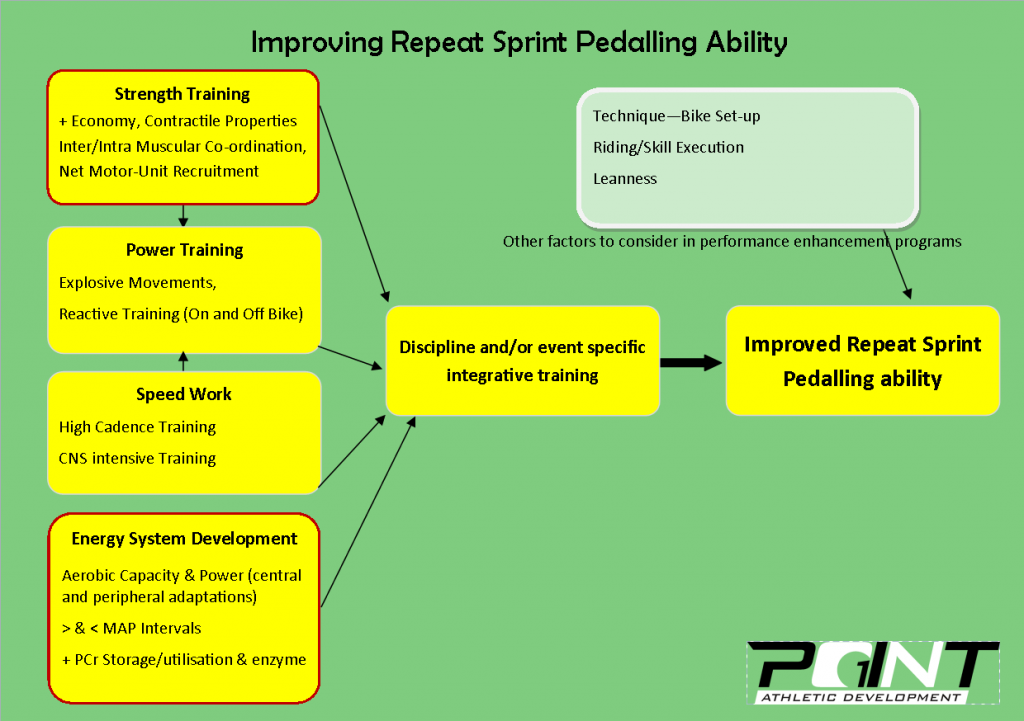
Below I’ve included a chart covering the main ways you can improve your RSPA. adapted from the fantastic work of Mladen Jovanovic @ www.complementarytraining.com

We could talk training methodology, influence of hostile environments (altitude) on RSPA, best practice during different stages of development, pedal type, tyre type, wind resistance etc… for days on end, so feel free to ask questions or create some discussion in the comment section.

Just always remember performance and fatigue are multi-factoral, so your training should reflect that. But you can’t train all factors all the time. So a good coach or clever head to plan your progressions in training is needed!

This is part 1 in a two part series, next up will be the pedaling demands of Enduro racing and how best to train for them!

RSPA


Chris


Categories
News Recipes Uncategorized

Point1 Chilli

Winter’s on it’s way! Nothing better than a massive bowl of ohh so very nutritious chilli to fuel you up after training and keep the immune system rocking.

Honestly there is so much awesome in this pot it’s mind-blowing. You’ve got some pics below and then the recipe with full nutritional breakdown in PDF form for you guys to download, print, share, save and use!

This chilli can be served anyway you like – I usually go for “lettuce-wraps” with homemade buckwheat and seed crackers for pretty much the most tasty nutrient dense feed any man, women, man-child or wee-man could ask for.

Enjoy! Sorry about winter.

20141006_185453

20141006_192222 (1)

20141006_193532

20141006_203214


http://point1athletic.com/wp-content/uploads/2014/10/Point1-Chilli-2.pdf

Categories
News Uncategorized

Posture, the posterior chain and hip health

It’s all about the junk in the trunk! Maybe a better way of looking at it is “their ain’t no position like the attack position”?

Posture is something your mother probably mentioned to you when you were (maybe you still are) a teenager. Well sadly for you it’s just as important on the bike as it is in daily life, in reality they are one and the same and that’s something I’ll talk about down below – awareness of daily postures.

So let’s get to business, the title says it all really, the posterior chain is something often refereed too, but seldom trained correctly and often neglected. What is it exactly? Well refer to exhibit 1 below. That’s right it’s the back side of your body from the erector-spinae right down to your Achilles tendon but  what we are going to focus in on a little more closely is the junk in your trunk…the gluteus maximus (there is a medius and minimus too), and the 3 muscles that make up the “hamstring” are our main hip extensors; i.e. they straighten your hip, think about going from seated to standing!

Posterior Chain

The real point of focus of this blog post though is the gluteus maximus ..why? Well simply put many downhillers and other gravity MTB riders I see are “quad-dominant”, they have over active hip-flexing muscles, poor overall hip mobility, weak abdominals and in some cases present with lower cross syndrome where the hip flexors are so tight they inhibit glute activation and subsequently the hamstring muscles and lower back have to take up the slack so to speak when extending the hip joint.

Lower Crossed

Why is that a problem I hear you ask, well long term it’s a recipe for disaster, from lower back pain to knee injuries and hamstring cramp and strains, having over active hip flexors and under used glutes leads to all those long term issues but in the more short term it basically means that you are not using your most power ful hip extensor! Which means 1) you won’t be pedaling anywhere near as powerfully or effectively as you could and 2) your posture, strength and overall technique on the bike in rough, steep or wild terrain will be severely hampered!

Simply NOT GOOD!

You see while the hamstring muscles (semitendinosus, semimembranosus and biceps femoris) all act to extended the hip they do so in a position specific manner. Depending on how flexed/bent your knee is the hamstring muscles have different roles and act in conjunction with our main hip extended the GLUTEUS maximus! The hamstrings hang off the pelvis and run to below the knee, as such they have a large role to play in knee flexion. The glutes however and specifically Glute Max are a one joint muscle, they hang of the top of your pelvis, lumbar spine and sacrum and attach at the femur. They are the King daddy of hip extension, power production and control! Once you master their correct function you’ll have nothing but fun and explosive playfulness on the bike! Don’t get me wrong the hamstrings have a pivotal role to play in keeping you “in posture” on the bike, especially when things get steep or sideways, but the glutes drive you back to “center” so to speak,

Point1 Athlete Cam Cole showing perfect posture and great Glute control
Point1 Athlete Cam Cole showing perfect posture and great Glute control Pic: tchouktv.com


Attack Position

The glutes are such a key muscle in mountain bikers posture and “attack position” for a few reasons.  You’ll often see the most elite mountain bikers in a very relaxed and tall positon on the bike, even when things are getting wild..why? Tall means limited knee flexion, which in turn means limited activation of your quad muscles and hip flexors and thus less energy expended. The muscles that maintain this mix of dynamic and isometric contraction to keep you “tall” are the glutes and to a lesser extent the hamstrings and in gros the posterior chain!

Your torso should remain neutral and strong while your hips travel through a pretty limited range of motion of flexion and extension to maintain control and execute techniques over the wildest of terrain. So yet again we can see the importance of glute strength and control! The glutes are also the primary muscle that resists flexion of the knee and hip, so think about 20m of successive Les Gets size braking bumps or a WC DH course like Mont Sainte Anne, what’s going to help you maintain posture, vision, control and speed? That’s right GLUTEUS MAXIMUS!

Josh Bryceland shoing the textbook "tall" relaxed posture.
Josh Bryceland showing the textbook “tall” relaxed posture. Pic tchouk.com


But we ain’t finished their, Gluteus Maximus also has key role to play in stabilising the hip joint. So for example, like discussed above, if you have “lower crossed” syndrome or some similar issues you’ll often find that you have pain in the front of the groin. Making it feel tight and sore, normally most people will go to stretch their hip flexors when it reality it’s poor glute strength and control that is leading to your femoral head sliding forward in the hip socket and causing issues. Strong glutes actively “pull” the head of the femur back and stop this issue. Likewise strong glute max means you’ll feel stable and “solid” on the bike in critical “gnarly” situations. Your centre of gravity is more likely to be maintained if you have strong glutes.

Similarly if you want to bunny-hop or “explode” or pop off of a small jump, drop or roller you’ll need to actively extend the hip and drive your centre of mass forward. This is achieved by having powerful glute max.

Gravity’s effect on the hip joint is also quite profound, especially when we actively multiple gravity by hammering down a mountain side and hitting turns, drops and rock gardens. Simply maintaining an erect posture or re-finding the “attack position” regardless of how “tall” or extended yours is requires glute control and strength. If finding yourself lower and lower and further and further back as you descend or ride sounds like you, ending up with a low torso, flexed knees and hips over the rear axle all the time is “your thing” then it is pretty likely that you have some glute control/strength issues and likely are presenting with some of the issues of “lower crossed” syndrome.

Luckily for you guys though, I’m here to help. I’m going to walk you through a few simple steps and exercises you can incorporate into your strength training or general exercise routines to help establish glute strength and control as well as lumbo-pelvic control, abdominal strength and hip-hinge mastery! All of which are the key ingredients of what we want to start cooking up on the bike.

In clearer terms what we want is a Stable Core – Mobile Hips but Strong and balanced everything!

How To:

1. Stabilise

First stop is to learn to stabilise the core, use your breathing muscles correctly and work on rotating your pelvis posteriorly! Sounds complicated but it’s not. Use well know anti extension core moves like planks (focusing on squeezing your glutes) as well as using active stabilising moves like the half kneeling shoulder press with a glute activation.

The best place to start with stabilising though for most people is the “DeadBug”. This move although simple looking requires supreme core control as you bring upper and lower limbs through full range of motion. It’s the perfect place to start to get your lower back to relax, pelvis to rotate back and genrally deal with dysfunction before we go on to load up or deal directly with strengthening the glutes and mobilising the hips!

2.Mobilise

Moblity for the hips, glutes and posterior chain is built on a foundation of control…plain and simple. There is no need to mobilise if you can’t control movement.

There are an endless list of drills to do for hip mobility as well as specific glute and posterior chain stretches that may be needed for certain people. One of my favourite “combo” moves though works to stabilise and strengthen the glutes uni-laterally while mobilising the hips in a way that is very useful to mountain bikers (external rotation, think inside leg when cornering hard). This move is called the “Sweeper”. I’ll let the video do the explaining.

Next up in the mobilisng list is the hip hinge…this is crucial, absolutely crucial if you want to learn to use your glutes to their natural potential and certainly if you wish to go on to actively training the posterior chain for strength! Watch the video below to see more and the keen eye will see the similarities between the hip hinge and the normal “attack-position” you should have on your bike.

Learning to hinge your hips means moving your hips through a wide range of motion while the knees stay static or work through a very small ROM. Similar to what we want on the bike (although we are in a slight split-stance on the MTB)!

One of my favourite combo moves though that covers posterior chain control and overall strength is this:

3. Strengthen

The list here is deep! Real deep. The amount of quality exercises that exist to work the posterior chain and glutes is very wide ranging. The best way to approach it though is to start basic and work your way up to mre complete or complex movements before you even worry about load. Once you’ve mastered the skill aspect of strength and gained the benefits there in terms of your glute strength then you can think about going back and loading up the more basic or complex moves with external weight!

The progression for Point1 athletes often goes something like this…

Bridging

Hinging/Swings

Light Single Leg

Bi-lateral – like Deadlifts

Heavy Single Leg/GHR’s

Partial Oly-Lifts or Explosive work

Now while that is the usual progression that doesn’t mean we don’t frequently regress the moves or mix and match as we need. Especially when hips become “tight” with long travel sessions in-season.

Once strength has been established in the posterior chain then we work towards making those moves more “powerful”, partial Olympic lifts, swings, explosive DL’s or fast RDl’s, not to mention depth jumps etc…

Here’s some videos to give you ideas of moves to use to STRENGTHEN the posterior chain and glutes.

Obviously we don’t just want to work or develop the posterior chain and forget about the other muscles in the lower or total body. But the reality is that the “front-side” of the body because we can see it in the mirror gets far more attention than the rear. Thus leading to the problems described above. Hopefully you are engaged in a balanced strength and conditioning program that will allow the body to work as it should synergistic-ally!


4.Integrate

The last piece of the puzzle for many is transferring over all the gym and mobility work to the bike. Well the easiest way to deal with integrating your hip hinging and posterior chain strength on the bike is to be mindful! Much of the benefits will transfer on their own via better posture and mechanics, but a little bit of mindfulness goes along way.

Aim to ride technically challenging or rough sections relaxed and tall, pop off anything you can see and be passively reactive! Now Passively re-active sounds like an oxymoron but what it means is you want to stay relaxed on the bike let gravity flow you over the terrain but at all times be looking for the split second spot on the trail where you want to actively push the bike down, extend your legs or pop off a lip. Use your new found hip strength and control to make speed, deal with gravity and cover ground faster and more comfortably!

By all means actively working the hip extensors on the bike with bunny-hops and explosive cornering is a great option also!

Finally here are some videos for all you visual learners:

Check out Point1 Trained, FMD superstar Neil Stewart from the 59 sec mark here to see how explosive he is through a very short range of hip motion but likewise how strong and stable his torso/hip angle stays when riding.

https://www.youtube.com/watch?v=QsOn75DCANA#t=59

Categories
Uncategorized

Technique – “On-Edge” Cornering

Even though there is more than one way to corner a push-bikes, when we talk “cornering” it’s frequently the classic outside foot down image that hits peoples mind…and rightly so!

The “classic” application of foot down technique requires the ability to move the hips laterally, drive the inside bar down, eyes forward and pelvis and shoulders square! And it’s this technique that many lesser riders struggle with regardless of terrain, bike and tyre choices.

This “hips out – bike over” technique allows you to get the bikes tyres “on-edge” which is real important when we are hitting longer turns with a mixed or not so grippy surface, when we want to carry big speeds or if the turn is beyond 80 degrees or so!

Point1 Athletic Development trained Neil Stewart does a mighty job of demonstrating here!

You’ll see that inside shoulder (head of the humerus), outside knee and ankle almost always line up in any rider with good technique!

How you arrive at a point to be able to apply this technique usual needs a multi-faceted approach and may very well form a indepth blog post in the future!


NS cornering

Photo: Laurence Crossman-Emms – Dirt Magazine – https://www.facebook.com/Laurence.CE.Photography?fref=ts

Categories
News Recipes

Point1 – Veggie Burger Deluxe

Varying your source of protein is a pretty good habit for sticking to a successful, tasty, performance enhancing diet! Variety, colour and texture are all pretty key parts of keeping yourself eating like a champ day in, day out!

It  seems to me that males in particular often go two ways – polarised opposites – either all out vegan or all out dead cow! Both approaches are the different sides of the same coin. Riders frequently think that depriving themselves of certain things will =equal success, like total sacrifice is needed to achieve your nutritional goals or similarly the total #NFG approach of I’ll eat what I want and just bury myself into the bars/pedals/weights twice as hard! Well neither approach is going to be optimal.

So that’s where tasty alternatives to the same old meals come in handy. Step in the Point1 Veggie Deluxe! A protein, nutrient and taste pack wee patty of awesome.

Once again, simple to make, cook and above all else performance enhancing tastiness. Each patty has decent amounts of protein, a moist but crispy texture and can form part of a variety of main meals or snacks.


20140728_171846

Ingredients:

500g of canned Chickpeas – drained, washed, re-washed and then soaked in some water and apple cider vinegar for at least 4 hrs!

Small Handful of grated Cheese, old, matured, raw milk awesomeness – aim for good stuff not plastic

35g Rolled Oats

35g Quinoa (about a quarter cup)- Red, black or white

1 Egg – Beaten

1-2 Tsp Wholegrain Mustard

1-2 Tsp Paprika

Pinch of Chilli Flakes

2 Tsp Cumin

1-2 Tsp Curry Powder

1 Tbs Herbs of choice

Sea-Salt and Fresh Ground Black Pepper – ‘cos that’s how we roll in the Point1 Kitchen!

20140728_171859

How to:

Mix Mustard and Egg together in a cup, combine all other ingredients in a large salad bowl. Mash bowl ingredients with a potato masher! Add in the Egg and Mustard mix, continue to combine/mash as you see fit until you obtain a nice mixture. If things seem a little moist then you can add in a little buckwheat flour to soak it up!

Make Patties in any thickness, shape or size you see fit. But round, plam sized ones about 2cm thick cook the best!

You can “cook” the burgers on a pan with some olive oil or walnut oil, on the BBQ or like I prefer under the grill. Cook until nice and golden on both sides, but not so long as to dry out all the ingredients!

Enjoy as you see fit, but hopefully for your health and performance you won’t be eating them in a filthy, industrial, nutritionally void white burger bun, but instead with a huge side salad, sweet potato fries and hummus!

Feel free to add in other beans/pulses instead of the 500g of chickpeas (as-long as they are well washed/soaked and prepped), I’ve used the same recipe with kidney beans, white haricots, lentils, extra cheese, no cheese, tons of Quinoa and split peas just to name a few!

20140728_175311

20140728_173321


Plated Up!

20140728_203152


Categories
News

“Fitness” – Pet Peeve and Culture

Time and time again on various MTB media articles across all mediums I read lines like “so and so has the “fitness” and “strength” or “fitness and power”  to win etc… Each time I read such a line I cry a little inside! The line that inspired this short post was the following;

“Rider1 had all of the power and fitness for the stage one win and the overall”.

Well what’s wrong with that I hear you ask…? It’s pretty straight forward really, the misappropriation of the word fitness. It’s become a strange old catch-all for qualities of endurance specific to each discipline and frankly as a physical preparation/coaching professional it gets my goat!

Fitness, simply, is suitability for a task, in the case of Enduro, for example, that encompasses many things, i.e. many components of fitness! Power being one of them, along with strength, aerobic capacity, anaerobic power and capacity, mobility, flexibility, stability…..it’s a long and frankly comprehensive list.

“Fitness” has many components but is not a specific single quality and as such should never be spoken about as one single un-tangible thing! Now you probably think I’m being unnecessarily pedantic but I’m anything but, my job is to increase riders “fitness” and do so I need to know what exact physical qualities/components are required to excel in their sport and discipline and in what ratios!

You see if for example Rider1 in the quote above had very poor power then he would no longer have the “fitness” to win Stage One! Simple. Power is a crucial component of fitness for a mountain biker…in all disciplines. What the author has done here is confused the word “Fitness” with “Endurance” .

Endurance has many definitions but really it’s most simply defined as “the ability to resist fatigue”. Not quite the same as fitness now is it!? How do we achieve “endurance” for out sport I hear you ask? We work on the components of fitness most relevant to our discipline, building them in such a way that we can not only meet or exceed the physical demands of that discipline but also resist the fatigue that meeting those demands creates!

Maybe the above went over your head or seemed totally pointless but for me it’s a question of culture and the environment that that culture creates!

Do the small things perfectly and the big things will look after themselves. Educating riders I work with is a key part of the coaching process and even small things like using the correct terminology consistently, leads to a productive environment where we all on the same page and focused on the same goal!

Rant over.

Oh and for those interested the varied and debatable” Components of Fitness are;

Aerobic Endurance
Short-term muscular endurance
Power
Strength
Speed
Flexibility and Mobility

Balance, Agility & Co-Ordination


Categories
News Recipes Uncategorized

Point1 PowerJacks

Like a flapjack but designed to maintain or maybe, who knows, even improve performance during your training rides or sessions! Between DH runs, on the lift when partaking in Broduro laps or trail side on a trail ride, these PowerJacks are simple to make, quick to cook, tasty, moist and portable! Get on the program my friends.

Ingredients:

20140728_142358


Dry

150g rolled oats – (soaked overnight in a small amount of yogurt/water/milk if you wish – adjust wet ingredients accordingly)

2 scoops (abut 120g) of your favourite “Recovery Mix” – I used Kinetica’s Complete (Chocolate Flavour) this time but have used similar products from High 5 and Optimum Nutrition.

Sunflower seeds and hazelnuts (or similar) to taste

1tsp of cinnamon

20140728_142753

Wet

1 ripe banana

150ml of Milk of choice (Cow’s, almond, hazelnut, rice etc… – not Soya, soya milk is filth!)

1 tsp of Vanilla extract

35-50 g of honey or maple syrup (Optional)

20140728_142846 (1)


How To

Pre-Heat a fan-oven to 180c. Mix all wet ingredients together until well combined; add to dry until a nice consistent mixture is obtained. Spoon mixture out into a rectangle about 1.5cm thick on a parchment paper lined oven tray. Top with Sunflower seeds for added texture and awesomeness!

Cook for 12-15mins in the oven, just enough so its slightly browned, to long and you’ll have some dry Jacks!

Remove from oven and immediately, but gently, cut into “bars” – this mixture will make 12-15 small bars. Let cool and BOOM you’ve got yourself some PowerJacks!


20140728_143318
20140728_143322 (1)


Make sure to eat with water/fluids and reap the benefits! Finished product below. Store them in some Tupperware for up to 3 days!

20140728_151235


Categories
News Recipes Uncategorized

Point1 Ride-Cake™

Performance Bread, Perf Cake…I wasn’t really sure what to call this creation but once I tasted it I knew it was more cake than bread and overall as it’s packed FULL of nutrients, vitamins and minerals it’s really a perfect mid-Ride snack, but too calorie dense to just snack on all day everyday! So Point1 Ride-Cake™ it has become!

Based on a Point1 Athlete only bread I call Bulk-Bread™ this cake is easy to make, requires 2 bowls only and one cake tin. One of the main ingredients is almond flour/meal so while very high in fat the mineral content is high and as such a perfect snack item to have for rides or epic trips that are going over the 2hr mark. It has a soft tasty texture, provides a variety of multi-transportable sugars/carbohydrates, is high in magnesium, phosphorus, potassium and has small amounts of sodium! All very important for muscle function and contraction. Due to the eggs protein content is high too so in theory and based on some limited research it may help you recover quicker and lead to less muscle soreness post ride, but that is debatable for now!

So here it goes:


Dry Ingredients

1 Cup Almond flour/meal (blanched or not your choice)

Half cup of buckwheat flour, Quarter cup wholewheat flour(ahh gluten), 3-4 tbps cocoa powder

1 tsp baking powder or bicarbonate of soda

1 tsp cinnamon (ground

Wet Ingredients

4 eggs (free-range) lightly beaten

1 tsp vanilla essence

6 or more tbps honey (melted)

50g-75g  70%+ dark chocolate (melted)

1 very-ripe banana


Combine all wet ingredients in a bowl, until well mixed. In a large, separate bowl combine all dry ingredients until you get a nice smooth “flour”. Add wet to dry, mix well but not overly well.

Transfer everything to a baking paper lined “cake-tin”, through it in an pre-heated oven at 180c for 31mins. Take it out, cool, enjoy!


Ride-Cake™


Top Tips:

If you are eating this while riding you must sip plenty of water. This is a “real-food” snack for riding so ideally only consumed after the 2hr 30min mark. Over consumption will lead to bad things mainly due to osmolity issues and subsequent stomach cramps. So be smart. 2 thickish slices with a small amount of jam between is perfect. Especially if you have had a gel, chew, fruit or other simpler carbohydrate source at the 1hr + mark into your ride.

Finally after a big days training or riding if you are searching for a simple dessert than Ride-Cake™ covered in Natural or Greek yogurt with some seeds and fruit is amazing!

And finally, finally – Feel free to remove the Wheat flour and replace with a gluten free alternative or just 1 full cup of buckwheat flour. The cocoa and half the flours could easily be replaced with your favorite protein powder to increase protein content. The cake would then become less “Ride” focused though. Likewise playing with extra honey, bananas or adding in a maltodextrin powder or other carbohydrate source to increase it’s “energy” content is fine. Possibilities are endless so go get animal in the kitchen.


Categories
News Recipes Uncategorized

Point1 Pro-Bar™

Energy bar, “power-bar” (that’s a Nestlé brand..be careful now), “cereal bar” (certainly not, cereal is  mainly for horses), pro-bar, a serious slab of home-made awesome! Call it what you will these bars are made with a basic “corner-stone” recipe that can be modified as needed to up any particular macro nutrient content you want, cover on or off the bike micro-nutrient worries or just simply to taste awesome and cover your energy needs out on a big old ride!

Other than in a prolonged flat out race like XCO, a time-trial or similar I’m a big fan of covering your energy needs via small, frequent intake of solid food and an electrolyte or “light” energy based drink.

These bars cover all of the needed bases, taste, texture, energy, micro-nutrients, simplicity, portability!

Pretty easy to make, simple to adjust, hold together well, have plenty of carbohydrate from multi-transportable sources and don’t stick to tin foil making an uneatable mess in your pocket.

So here goes! Choc-Nut-Protein-Fruit-Energy-#Point1-Pro-Bar – Surely there is a catchier name than that?


Ingredients:

1 cup of Medjool Dates or other re-hydrated or moist fruit

1 scoop of Chocolate or Vanilla Protein Powder

1 teaspoon of Cocoa powder (if desired, depends how “dark chocolate” you want them to taste)

Half cup of Rolled Oats

Half to 3/4 cup of Apple Sauce

1 cup of frozen Raspberries

Half cup  of dried, unsweetened Coconut

5-6 tablespoons of honey

Handful of nuts of choice – I used hazelnuts only in this recipe

Texture of batter should be thick, smooth and slow running – you can add a small amount of liquid or dry ingredients to the above to achieve this texture – It all depends on your fruit “dryness” I think – But choose extra ingredients carefully – Think of Macro content!

How to:

Mix/Blitz the medjool dates with a teaspoon or two of water in a large bowl with a handheld blender – This may take a while (the dates will need to be pitted and chopped before you start)

20140507_200255

Add all of the wet ingredients to the Dates and mix until you get a nice runny consistency – The honey may have to be heated slightly to stop it sticking. Add in your frozen Raspberries or other frozen fruit and mix well.

20140507_203117

In another bowl thoroughly mix all of your dry ingredients – Slowly add the wet mixture to the dry until a nice smooth batter is achieved!

Poor this into a baking paper lined dish and place in a pre-heated oven at 170c – (I used a fab oven so adjust temperature accordingly)


Cook until a little crispy but not black on top – a small knife should come out clean – To get a nice texture for storage and use on the bike it’s important to use a try big enough so that the batter pours out to an even 1cm – 1.5cm  while wet in the dish. After cooking this should rise to almost 2cm and be perfect to cut into consistent but moist bars.

20140507_214807

The above recipe makes from 10-14 bars depending on how you cut them.

20140508_105807

Please feel-free to comment on how you’ve modified the recipe or even if you like the taste or have any thoughts, tips or tricks!


Categories
News Recipes Uncategorized

Point1 Granola – GNAROLA™!

Gnarly Granola! This is taste central. “Shop Bought” granola and muesli will often have plenty of additives, preservatives and generally a huge amount of grain and not much of the good stuff you want, i.e. – nuts, seeds, fruits, quality honey and no added sugar!

So step in the simple as chips Point1 Gnarola™, like granola only gnarlier!!!

This is simple enough to make even for those who burn water in the kitchen, all you need to do is buy good qaulity ingredients, drop the smartphone for 8 minutes and you are set.

Ingredients:

DRY

150g Mixed Nuts (I used Walnuts and Hazelnuts but whatever nuts you want, brazil-nuts taste amazing and are packed with selenium!)

250g  or about 2 Cups of raw rolled Oats

35g Pumpkin Seeds

50g Ground Flaxseed/Linseed/Chia Seed…any seed!

25g chopped/dried coconut

2 tsp or more of Cinnamon

WET

15-20ml Walnut oil

150g or 4-5 TBSP of decent Honey (Maple Syrup works fine too)

AFTER BAKING – ***optional***

150g Chopped dried fruits of choice – I used fig, sultanas and prunes – re-hydrate if you wish

20140506_194920

How To:

Pre-Heat the oven to 155c (fan oven) – Line a decent size baking tray with parchment/baking paper.

Mix all of the dry ingredients together in a large bowl – you can play with exact quantities of each type of ingredient.

20140506_195750

Combine your oil and honey in a small bowl and heat until real runny over a bain-marie or at worst in the microwave.

20140506_200056

Pour wet stuff into dry, give it a good mix (it should coat but not overwhelm the dry ingredients); spread out all of the Gnarola mixture thinly onto the baking tray, place in the oven for 10-15 minutes until she is golden and crispy! Make sure to keep an eye on the oven as it burns easily and burnt food ain’t ever good for you! EVER!

20140506_200531

Once out of the oven, you should have a dry, light and crispy granola. Add in your chopped mixed fruit, let cool and store in an airtight container.

20140506_205528

It can be enjoyed with the milk of your choice, but my favourite is with yogurt as part of a pre-ride breakfast. A big sprinkle on some good porridge made from well soaked steel-cut oats is amazing also, especially with more cinnamon and apple compote on top!

20140506_211835

20140506_210809

Basic Nutritional stuff:

Obviously with all the fruit, honey and oats this is not the kind of thing to be eaten 5 times a day in huge quantities if you want to stay, lets say, in race shape. Enjoy it in moderation as part of an overall savage diet and you’ll be well….a savage!

The oats are packed with fibre and carbohydrate, the honey is a wild mix of a variety of sugars. Nuts like hazelnuts and walnuts are packed with thiamine (B1), Vitamin B6, protein, quality fats and very importantly for any bike rider minerals like magnesium, manganese, zinc and iron all of which are very important for proper CNS function, cell health and muscular contraction.

Likewise sunflower seeds and flax-seed both pack a mega nutritional punch with high amounts of fibre and trace minerals!

Finally the dried fruits (dates, figs and sultanas in this case) add to the carbohydrate content which is important on a riding or training day or for recovery but they also, unknown to many people, are full to their sweet wee gills with important minerals like iron, magnesium, zinc and potassium! Add in the cinnamon and all the yogurt, “veggie milks” or whatever else you eat with the Gnarola and you’ve got yourself a serious snack!

Wrap Up: Point1 Gnarola™ – Tastes the business, is packed with quality carbohydrate, protein, fats, vitamins, minerals and provides a great crunchy texture in a moderate GI package that’s packed with fibre! Enjoy it anyway you want.

Feel free to comment with any additional ingredients you add.